Home » Without Label » How To Build Cabinet Face Frames / Shaker Sideboard - Popular Woodworking Magazine - I had to use blocks behind the face frames at each hinge point so that the hinge would be even with the edge of the face frame.
How To Build Cabinet Face Frames / Shaker Sideboard - Popular Woodworking Magazine - I had to use blocks behind the face frames at each hinge point so that the hinge would be even with the edge of the face frame.
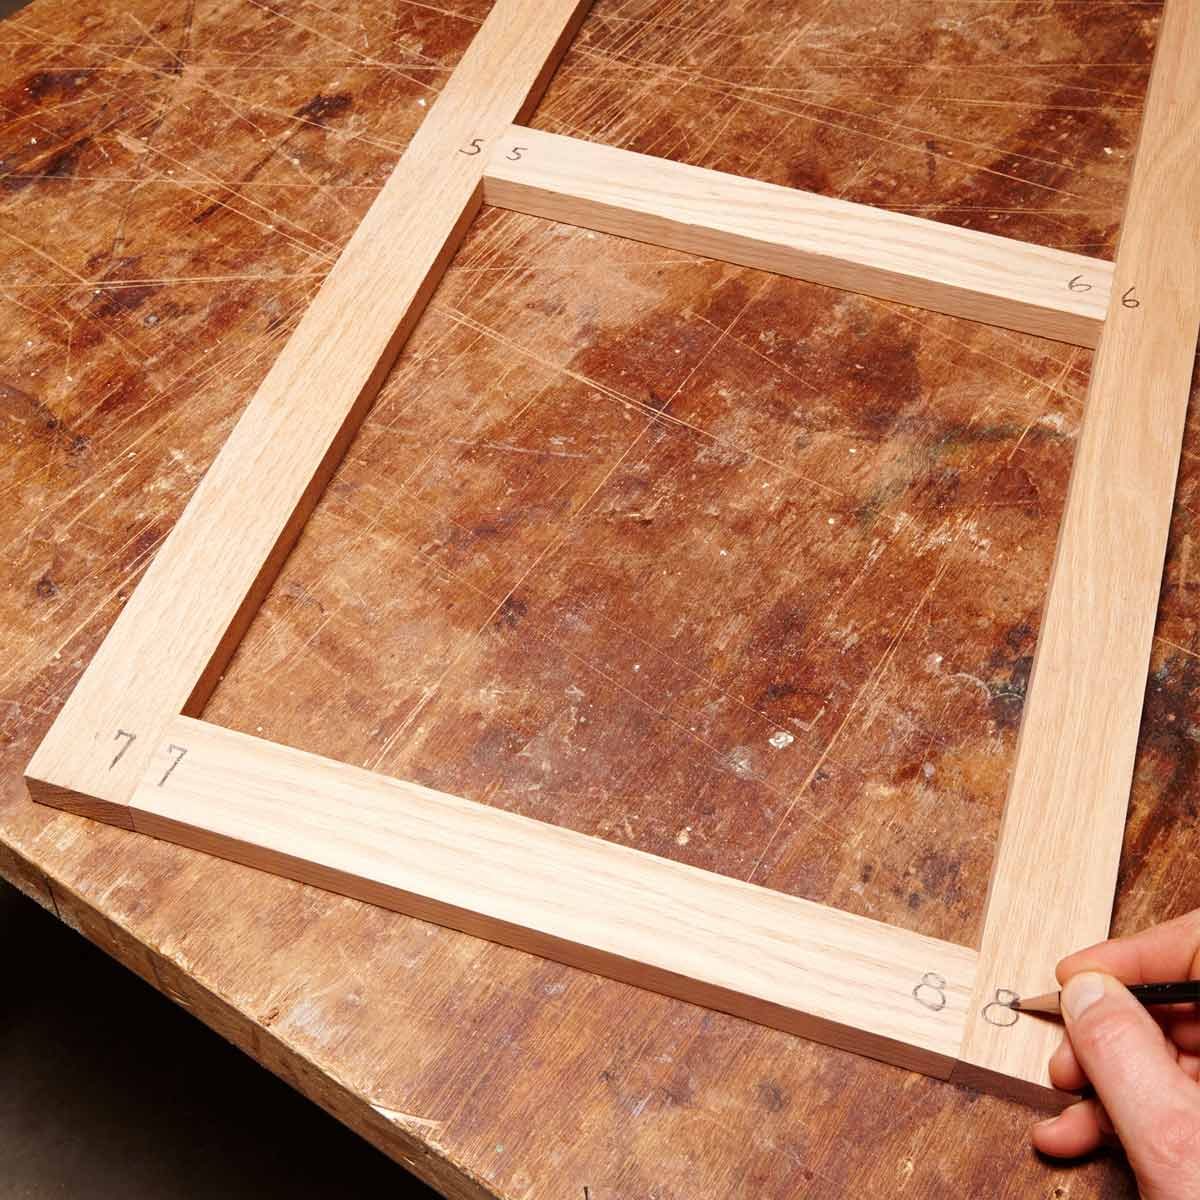
How To Build Cabinet Face Frames / Shaker Sideboard - Popular Woodworking Magazine - I had to use blocks behind the face frames at each hinge point so that the hinge would be even with the edge of the face frame.. This is an up close view of the pocket hole screws, complete with old pencil mark. The above image is demonstrating a common cabinet construction. Im jason and i have been building wooded cabinets and woodworking in general for the last. Outside edge options for prefit doors. Then replace the old doors and drawer fronts with new ones.
Usingjust a few tools, this video shows you how to build face frames andattach to kitchen ca. We build our face frames 1/4 bigger on each side than the cabinet, so when you line up your cabinets, all you have to do is line up the face frames. The milling is quick and the case is really easy to clamp this way. I have a table saw dedicated to dados with a powerfeed. We also use the nailer to attach the face frames where we couldn't place pocket holes (the bottom underside).
Face Frame Cabinet Plans and Building Tips | Family Handyman from www.familyhandyman.com If you want a larger more noticeable frame, you can use wide boards. Square parts make square cabinets. To finish off the front of the plywood edges, you will need to either use edge banding to create a frameless cabinet or a face frame to create a face frame cabinet. Our face frames are completely built to your specifications, with each opening measured with calipers. Refacing cabinets is a quick and easy way to change the look of your kitchen without the mess and expense of a complete remodeling. Also, when you go to install drawers, the drawer slides are. Their main duty is to hold the frame in place while the glue dries. Now subtract the thickness of the back from your fence setting, and cut the bottom panel to width.
We also use the nailer to attach the face frames where we couldn't place pocket holes (the bottom underside).
Then cut them to length. Their main duty is to hold the frame in place while the glue dries. Pocket hole screws on the inside of cabinet. Use a long rule to measure from the stiles over to the opposite edge of the cabinet (see photo 1). A couple per side and wherever there's a void should do the trick. See more ideas about diy kitchen, kitchen design, face frame cabinets. Attaching the frame to the case hides the holes. To buy the plans to the cabinets in this course as well as kitchen cabinet plans and calculators, visit: Also, when you go to install drawers, the drawer slides are. Then cut the bottom to length. Our face frames are completely built to your specifications, with each opening measured with calipers. Determine the width of your face frame based on your cabinet design, and rip all the pieces to a width that is a bit wider than the final face frame dimension. The.375 x.375 rabbet is cut on the face side of the face frame to receive the face frame.
Their main duty is to hold the frame in place while the glue dries. This is an up close view of the pocket hole screws, complete with old pencil mark. It's easier than you'd think to build your own kitchen cabinets. Discusses how to make face frames for cabinetry. The milling is quick and the case is really easy to clamp this way.
How to build and attach a cabinet faceframe - Sawdust Girl® from i0.wp.com Once you determine your size and layout, use pocket hole screws and wood glue to create the frame, making sure to check for square. Also, when you go to install drawers, the drawer slides are. After all the face frame parts are ripped, clean up the saw blade marks by following the process that george shows. Pocket hole screws on the inside of cabinet. Their main duty is to hold the frame in place while the glue dries. Individual face frame members fasten to the foundation boxes one piece at a time, held in place with glue and clamps or glue and metal pins or brads. This is an up close view of the pocket hole screws, complete with old pencil mark. Usingjust a few tools, this video shows you how to build face frames andattach to kitchen ca.
Determine the width of your face frame based on your cabinet design, and rip all the pieces to a width that is a bit wider than the final face frame dimension.
Outside edge options for prefit doors. Our skilled craftsmen will subtract your specified gap from caliper dimensions and trim doors and drawer fronts to match the sizes calculated from above. The above image is demonstrating a common cabinet construction. Face frames are typically built from 1×2 boards (which are actually 3/4″ thick and 1 1/2″ wide). We also use the nailer to attach the face frames where we couldn't place pocket holes (the bottom underside). Apply some wood glue and drive your screws into the pocket hole. I had to use blocks behind the face frames at each hinge point so that the hinge would be even with the edge of the face frame. This is an up close view of the pocket hole screws, complete with old pencil mark. Our face frames are completely built to your specifications, with each opening measured with calipers. A customer had a double built in oven removed, and a single installed. Set the plate joiner to the proper biscuit size (i prefer a #20 biscuit) firmly hold the top plate of the joiner flush to the face frame edge. If you are adding face frames, take that thickness into account. It's easier than you'd think to build your own kitchen cabinets.
The concealed hinges were blum. Start by ripping two side pieces to the cabinet depth (minus the frame thickness); If you are adding face frames, take that thickness into account. Properly attaching the cabinet face frame to the case is crucial to ensure your cabinets are sturdy and endure the wear and tear of repeated use. I have a table saw dedicated to dados with a powerfeed.
Kitchen Cabinet Sink Base 36 Full Overlay Face Frame ... from i.pinimg.com Then cut the bottom to length. We build our face frames 1/4 bigger on each side than the cabinet, so when you line up your cabinets, all you have to do is line up the face frames. Outside edge options for prefit doors. Wood magazine's kevin boyle shows you this foolproof method, expla. Learn how to make a lower cabinet face frame. The extra length will make your face frame overhang the edges of the cabinet by 1/8 in. Our face frames are completely built to your specifications, with each opening measured with calipers. When i built our mission style cabinets, i used 1.5 wide face frames and frame and panel doors with 1.5 stiles and rails.
Square parts make square cabinets.
#3 • apr 12, 2009. How to make cabinet face frames the shop plan for this cabinet says we need two 2 x 30 stiles, a 3 x 10 top rail and a 2 x 10 bottom rail. Attaching the frame to the case hides the holes. This is an up close view of the pocket hole screws, complete with old pencil mark. For example, if i am adding a 1″ face frame thickness, i cut my plywood to have a finished depth of 11 1/4″. Also, when you go to install drawers, the drawer slides are. Determine the width of your face frame based on your cabinet design, and rip all the pieces to a width that is a bit wider than the final face frame dimension. To finish off the front of the plywood edges, you will need to either use edge banding to create a frameless cabinet or a face frame to create a face frame cabinet. I know the right way to do it would be to make a complete new face frame, which would involve taking out the oven and the cabinet doors above and it's a ceiling height cabinet. We applied glue to the fronts of the cabinets, and then carefully attached the face frames to the cabinets with the pocket holes we drilled in the outsides of the sides. Individual face frame members fasten to the foundation boxes one piece at a time, held in place with glue and clamps or glue and metal pins or brads. I had to use blocks behind the face frames at each hinge point so that the hinge would be even with the edge of the face frame. Set the plate joiner to the proper biscuit size (i prefer a #20 biscuit) firmly hold the top plate of the joiner flush to the face frame edge.